unix time to spreadsheet time

In Unix and Linux, times are stored as seconds since the Unix Epoc, 1970-01-01 00:00:00. Spreadsheets often use a different Epoc and they tend to store days instead of seconds.

When I import timestamped data that came from Unix land, I have to compensate for those differences.

First, I format two cells to YYYY-MM-DD HH:MM:SS and entering “0” as the cell data of the first. It shows me the epoc this program uses.

Next, I put the Unix Epoc in the second cell as “1970-01-01 00:00:00” and that’s what I see in that cell. Then I remove the DATE formatting from that cell and I’ll see the difference between them in days. In LibreOffice, I see “25,569.00” – reveal the decimals to avoid a rounding error.

Now, to convert, I use this formula in cell B2:
=(A2/86400+25569)
where A1 is the cell with the unix epoc seconds
I format B2 as whatever date/time I like to see.
Then I copy the formula in B2 all down the B column to convert cells in all the other rows.

Efficiently find missing numbers in a sequence

This awk will print out the numbers missing in an ordered sequence that starts with the number you set “a=” to in the BEGIN block.

awk 'BEGIN {a=1} { while (a++ < $1) {print a-1} }'

For example, here I have a few calls to seq create a sequence of integers starting at 1 and having gaps.

$ (seq 1 4; seq 7 10; seq 15 20) | awk 'BEGIN {a=1} { while (a++ < $1) {print a-1} }' 5 6 11 12 13 14

Home brew passgen with rand and bash

I made this up this morning and I think it doesn’t suck. I put it in my .bash_aliases file, which is read by my .bashrc and then I have them on the command line:

mkpass_string() {
BOFS=${1:-Get}
EOFS=${2:-Clue}
SEPS=$(rand –mask ‘,.-=*_+^@’ -N 2 -d ” )
rand -M 99 -N 2 –bof “${BOFS}” -d “${SEPS}” –eof “${EOFS}”
}

mkpass() {
echo $(mkpass_string ${1} ${2})
}

Then I use them like this:

$ mkpass Milk rain
Milk35^+64rain

$ mkpass X Y
X21,,66Y

$ mkpass X Y
X70_-95Y

$ PASS=$(mkpass_string Blue Screw)
$ echo $PASS
Blue45*-74Screw

Just thought y’all might like it.

Letting NIS through Linux firewalls

I’ve had to do this a few times and I always forget and have to learn again. So here I am, memorizing it in my off-brain cache…

Overview of NIS

A Network Information Service (NIS) is a system for sharing service configuration info. It’s old, insecure, but still very useful. It relies on having a master on which we maintain the config info in text files called “NIS maps” and slaves that copy the maps from the master and make them available to the clients, the servers that use the config. info.

When we change a map on the master, we run make -C /var/yp (which some of us have aliased to “ypmake”). Make examines each map in turn and if it has changed, runs makedbm to copy the data from the map into a DBM file. It’s those DBM files that ypserv on a slave copies from the master, using ypxfrd, and then ultimately reads to answer a client’s questions – like “what is mdiehn’s UID?”

The communications between master and slave servers and between the clients and the slaves are carried over RPC and that involves the RPC Port Mapper. So, to make this all work, there are four daemons on at least three computers that need to be able to talk to each other:

  • ypbind – runs on clients machines and talks to ypserv. Maintains the NIS binding inf. for the client.
  • ypserv – Runs on the NIS servers, both master and the slaves. Makes the NIS inf. available to clients.
  • ypxrfd – runs on the slave servers and helps copy the DBM files from the master to the slave.
  • portmap – runs on all the machines to facilitate client-server RPC connections.

Changes to NIS daemon startup.

First, make your slave server start ypserv and ypxrfd with specific ports so you know what they’re register with the RPC portmap daemon and we can configure its firewall to let packets to those ports in. If you don’t they will pick random, high numbered ports to register with portmap and we won’t know what to put in the firewall config.

In CentOS or RHEL, you do that by adding this to the /etc/sysconfig/network file …

    YPSERV_ARGS="-p 834"
    YPXFRD_ARGS="-p 835"

… and then restart the services:

    service ypserv restart
    service ypxrd restart

Of course, on CentOS 7 and RHEL 7 or other systemd systems, we use

    systemctl restart ypserv ypxfrd

Firewall Changes

Adjust your firewall configs to allow traffic to those ports *and* to the RPC port mapper’s own port, 111. These are from iptables-save on the server I worked on today:

Raw iptables – *shudder*

So you have this in case you need it.
iptables -A net-fw -p tcp -m tcp --dport 111 -j ACCEPT
iptables -A net-fw -p udp -m udp --dport 111 -j ACCEPT
iptables -A net-fw -p tcp -m tcp --dport 834 -j ACCEPT
iptables -A net-fw -p udp -m udp --dport 834 -j ACCEPT
iptables -A net-fw -p tcp -m tcp --dport 835 -j ACCEPT
iptables -A net-fw -p udp -m udp --dport 835 -j ACCEPT

And then save your iptables config however you Distro docs say to do it.

Using shorewall

If you’re working with Shorewall, like I am on this HPC cluster head-node, you can add these lines to the /etc/shorewall/rules files, which is the stored config,

# -- Allow RPC portmapper traffic from outside to the master
ACCEPT net fw tcp 111 # portmapper
ACCEPT net fw udp 111

# — Allow RPC to assign ports for ypserv on the master
ACCEPT net fw tcp 834 # ypserv
ACCEPT net fw udp 834
ACCEPT net fw tcp 835 # ypxfrd
ACCEPT net fw udp 835

And then run shorewall reload to pick up the changes.

Other firewalls?

There’s UFW on some Ubuntu releases, and there’s firewalld on some RHEL and CentOS and various other systems. If you want me to add them here, just send me what you want put in.

Helpfull docs

Besides the links I gave above, I found these useful.
Signing up for the ENFIELD ListServ

What’s the name?

Before I get started, let me explain something about the name “the Enfield ListServ.” Actually, “ListServ” is the brand name of a server software that organizations use to manage e-mail mailing lists. Enfield doesn’t have a ListServer server, our mailing list is hosted for us by Dartmouth on theirs. So, you could call our list “The Enfield Mailing List” if you’d like to use correct terminology.

However, saying “Enfield ListServ” is still a great way to refer to the thing. Why? Because there are many other mailing lists for Enfield someone might believe you mean if you use the “correct” name. If you say the “Enfield ListServ” anywhere in the Upper Valley, everyone will know what you mean or they’ll be confused and ask.

Also, it just makes me smile happily whenever one of our subscribers thanks the the community by writing to the list: Thanks, listserv!! You're the best!. Just makes me giggle.

Sign-up Overview

  1. Register at Dartmouth’s ListServ server
  2. Request a subscription to the ENFIELD mailing list
  3. Answer the humans when they e-mail you
  4. Read and save that Welcome e-mail

Register at the Dartmouth ListServ Web UI

Using the WebUI can be annoying for some of us. It’s written for Dartmouth people, assuming you already have a username that will work there. We’d send you another easier sign-up route except that having access to this UI is very, very useful for users.

Here’s how you get into it and get signed up.

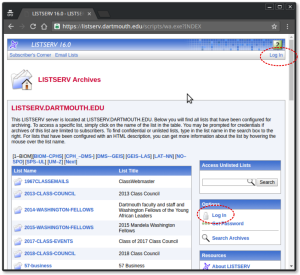
  1. Load this URL into your browser: https://listserv.dartmouth.edu, land here:

    LISTSERV Home Page

    LISTSERV Home Page

  2. NOTICE there are many mailing lists run from here. You are about to create a username and password for this system, not just for the ENFIELD mailing list. You’ll use your e-mail address as the username, though. OK. Got that? Proceed:
  3. There are three ways to proceed, all leading to you registering a username and password to use at this LISTSERV Web Interface:
    1. Notice and use the Log In link at top right or in the Options Box at right
    2. Notice and use the Get Password link in the Options Box at right
    3. Find the ENFIELD entry in the long list of mailing lists, notice and use the Log In links on *that* page.
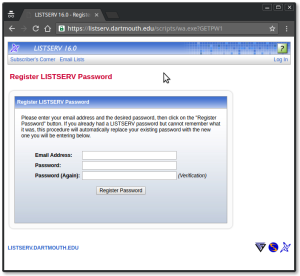
  4. All of those routes lead you more or less directly to the Get Password page, which is really an account registration or creation page that looks like this:
    register_listserv_password
  5. Enter the e-mail address you’ll use to subscribe to the mailing lists on this site.
  6. Make up a new password! Don’t use one you use elsewhere!!
  7. Enter that password twice.
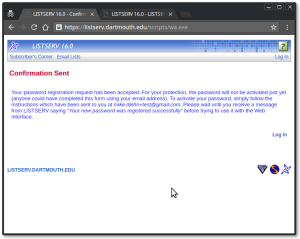
  8. Press Register Password and land here:
    What you'll see after you press Register Password.

    What you’ll see after you press Register Password.

    NOTE: ignore this sentence at the end – it’s wrong when you’re doing this in the Web UI: Please wait until you receive a message from LISTSERV saying “Your new password was registered successfully” before trying to use it with the Web interface.

  9. Go find the “Command confirmation request” e-mail in your Inbox or maybe your spam folder.
  10. Click the link in the message.
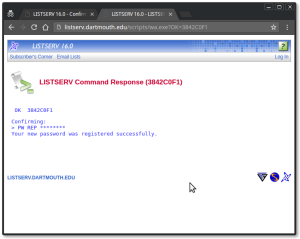
  11. You’ll land on a page back at the listserv UI that looks like this:

    This is what you see after you click the link in your e-mail. You're all done at this point.

    This is what you see after you click the link in your e-mail. You’re all done at this point.

  12. Remember I told you to ignore that bit that said to wait for another e-mail confirming your confirmation? This page *is* your confirmation. You’re done. For now. 🙂 You’re registered now.
  13. To get ready for the next step, find the white words LISTSERV 16.0 in the banner at top and click them

Request a Subscription

NOTE: you are actually requesting a subscription. The system will make your confirm your request and then will send your request to us humans for verification. We humans will e-mail you a letter explaining what and *who* our list is for and asking if you really belong here. Once you answer us and we agree you should be added, we’ll approve your request and the system will add you.

Yes, it’s probably possible to make this simpler and quicker, but we’d have to make time to learn a lot more about running LISTSERV lists than either of us know right now and we’re not up for it yet.

Find and Subscribe

You can use the following process to request a subscription to any list on this site now that you have registered. I’ll walk you through doing it for our list. There are a few ways to subscribe. I’m going to show you only one:

  1. Log In – link at the top right or in the Options box to the left.
  2. Browse for the ENFIELD entry in the long, long list of mailling lists
    1. Use the alpa-links above the lists. ENFIELD is in [DMS-–GEIS]
    2. On the DMS–GEIS page, scroll down and find ENFIELD and click it.
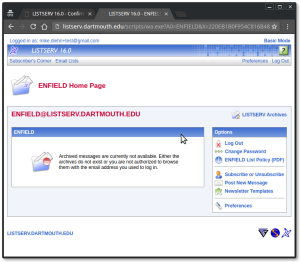
  3. You’ll land on a page like this, where all the important stuff for right now is at *right*:

    ENFIELD Home Page

    This is the home page for our mailing list. When you’re subscribed, you’ll see the list archive here and you can post message from here.

  4. Find the Subscribe or Unsubscribe link at right and click on it.
  5. Fill in your real name and pick your Subscription type.
  6. If you know LISTSERV options and want to set some, use the Show Advanced button for that.
  7. Click the Subscribe (ENFIELD) button.
  8. NOTICE the message at the top changes and tells you to go to your e-mail to confirm this request.
  9. Go find the Command confirmation request in your Inbox or Spam folder.
  10. Click the link and you’ll see a Confirming page like you did during registration.
  11. You’re done for now.  You can close those windows.

Answer the humans

At some point soon, usually only during business hours, one of us list admins will notice the e-mail from the system about your request and we’ll send you a note asking, essentially, if you really belong on this list.

Answer it! We won’t chase you down if you don’t. After you do answer it, we’ll approve your subscription.

Read and Save

You’re going to get at two more messages from the ListServ server once we admins tell it to add you to the list. READ and save them! They will help you six month or years from now.

  1. Subject: “You have been added to the ENFIELD list”
    This one tells you we added you and your subscription is live. It can seem daunting and many people skip over it. Howe do we know? Because people regularly write to the entire list population asking how to do things this messages tells you how to do.  So, at the very least, skim over it so you know what it tells you how to do. PLEASE! Here are some things it tells you how to do:

    1. post a message to the list
    2. hot to contact the admins (owners),
    3. send commands to the ListServ system to change things about your account,
    4. how to unsubscribe most easily.
    5. Lastly, it tells you about the WebUI. Which you already know about.
  2. Subject: “Enfield Listserv”
    This one is a welcome message. That’s it. Nothing terrible useful in it right now.  We may re-vamp it.


That’s all, folks.

mysqldump error “insufficent privileges to SHOW CREATE PROCEDURE”

Haven’t found this documented anywhere so here it is:

A user reported today that while trying to dump his database, his mysqldump command was reporting this error:

testdev has insufficent privileges to SHOW CREATE PROCEDURE

Turns out the problem is that user testdev has all permissions in it’s own database, but no permissions in the mysql database.  It’s sufficient in this case to grant the user just select on the mysql.proc table:

GRANT SELECT ON mysql.proc TO 'testdev'@'%';

And that fixed it.

Linux timer app command line goodness!

I googled for “linux timer app” looking for something like a virtual kitchen timer I use to remind me to switch back to standing after a sit-break at my workstation.  And Google found this gem for me from Pat Brisban on the ArchLinux forums:

  # set an ad-hoc GUI timer
  timer() {
    local N=$1; shift
    (sleep $N && zenity --info --title="Time's Up" --text="${*:-BING}") &
    echo "timer set for $N"
  }

It’s a bash function you stick in your .bashrc or .bash_aliases file and then call from the command line like this:

  $ timer 30s
  $ timer 35m get the laundry

As Pat said: “works great.”

via Good Timer App? (Page 1) / Applications & Desktop Environments / Arch Linux Forums.

Letting NIS master notify a firewalled NIS slave server of updates

We have a NIS master on our corporate network. One of it’s slaves has it’s Shorewall configured iptables firewall enabled. Whenever we would update the NIS maps on the master and run “make -C /var/yp” to push the changes out, we’d get RPC errors about that firewalled slave server.

They looked like this (names changed blah, blah, blah):

[root@nis-master ~]# touch /etc/nis/netgroup
[root@nis-master ~]# make -C /var/yp
make: Entering directory `/var/yp'
gmake[1]: Entering directory `/var/yp/ourdomain.com'
gmake[1]: `ypservers' is up to date.
gmake[1]: Leaving directory `/var/yp/ourdomain.com'
gmake[1]: Entering directory `/var/yp/ourdomain.com'
Updating netgroup...
YPPUSH: Cannot call YPPROC_XFR on host "firewalled-slave": RPC: Unable to receive; errno = Connection refused

Updating netgroup.byhost...
YPPUSH: Cannot call YPPROC_XFR on host "firewalled-slave": RPC: Unable to receive; errno = Connection refused

Updating netgroup.byuser...
YPPUSH: Cannot call YPPROC_XFR on host "firewalled-slave": RPC: Unable to receive; errno = Connection refused

gmake[1]: Leaving directory `/var/yp/ourdomain.com'
make: Leaving directory `/var/yp'
[root@nis-master ~]#

What to do, what to do? Well, firewalled-slave is CentOS 6.4. And therefore, the shorewall firewall package is aboard. That thing manages iptables rather neatly for us, so we’ll be updating firewall rules in /etc/shorewall/rules. Which is well commented. In addition, trolling Google I dug up these links:

Dynamic iptables rules for NIS server

From the first, Pratik’s admin blog, I learned about rpcinfo -p and then read the man page and looked around at /etc/rpc and did some thinging.  That got me googling for “linux iptables ypserv ports.”  And that led me to the second link:

http://www.centos.org/docs/4/html/rhel-sg-en-4/s1-server-nis.html

 That one showed me how to tell ypserv (and ypxfrd, which I don’t need here) to use specific ports rather than letting rpcd pick some for them.  Which meant I could then add rules to /etc/shorewall/rules to tell iptables to let updates in from nis-master.

Simple steps:

  1. add this to /etc/sysconfig/network: "YPSERV_ARGS="-p 874"
  2. run service ypserv restart
  3. add this to /etc/shorewall/rules:
    # 2016-06-27 09:48 mdiehn
    # -- Allow NIS traffic from outside to the master's slave ypserv on
    # -- the port we specified in /etc/sysconfig/network as
    # -- YPSERV_ARGS="-p 834"
    # -- YPXFRD_ARGS="-p 835" <-- we don't run this on marlin
    #
    ACCEPT net fw tcp 834 # ypserv
    ACCEPT net fw udp 834 # ypserv
    #ACCEPT net fw tcp 835 # ypxfrd
    #ACCEPT net fw udp 835 # ypxfrd
  4. run service shorewall restart

And that’s all there is to it.  Now when we run “make -C /var/yp” on the nis-master, it works without errors and the updates appear on firewalled-slave.

Finding the du – df difference.

Long time system admins will have run into this from time to time: a file system appears to be full when you look at it with df but not when you use du to check it out.

Today, this problem appeared dramatically. Our monitoring system reported that the root file system one of our servers, cloudhost07, was at 96% utilization. I logged onto that server and used df and du to start looking for the culprit:

[root@cloudhost07 /]# du -hsx /
1.3G /

[root@cloudhost07 /]# df -h /
Filesystem       Size  Used  Avail Use% Mounted on
/dev/vg/lv_root  7.7G  7.0G  354M  96%  /

The two bold numbers should be about the same. Large differences like the one we see here mean that a file has been deleted from the filesystem but some process still has it open. This happens from time to time and it’s not usually a problem. In our case, though, it’s happened because a verbose process is writing log entries to a log file that hasn’t been properly rotated.

We “rotate” log files to keep them from growing without bound and filling a file system. There are a few ways to get this done: (1) the process can do it internally, (2) we humans can do it manually from time to time or (3) we can use an independent program like logrotate to do it for us. Humans are not good at repetition on the scale and at the accuracy needed to manage computers. So we usually go with item (1) or (3). Either way, the way to do the rotation is:

  1. check the current log file: does it need rotation? Yes? Proceed:
  2. rename the current log file (mv daily.log daily.log.0)
  3. create the new log file (touch daily.log; chmod/chown daily.log)
  4. signal the process to close the filehandle to it’s current log file and open one to the new log file, thereby change the current to old and the new to current.

At step four, the process starts writing into the new log file, completing the rotation processes. There’s more to it, but that’s the gist.

Imagine what happens if you forget to do step four. Or can’t for some reason. The process keeps writing into the current/old file and the log rotation process never sees the new/current file get bigger. And the file grows without bound, invisibly.

Scouting Controversy

I’m a Cub Scout den leader: when my middle son wanted to join I stepped up because there wasn’t anyone else. Our family aren’t religious and we aren’t conservative. So I was nervous. I learned though, that Scouting isn’t all that much about religion and it’s definitely not about sex or gender. Or really even fires, tents and such. Scouting is about role models, team work, community bonds, trust, honesty, respect, and – and here’s the kicker – instilling in the children our culture’s values.

And I think that’s what all this fluff and controversy is about. The anti-gay population don’t want kids growing up thinking that it’s OK to choose to be gay. The rest of us believe that it’s not a choice but a characteristic. We believe that hiding it is dishonest and discriminating against it is disrespectful.

Since both sides value honesty and trust so highly, we’re at a bit of a loggerheads about the matter.